I recently visited some old clients and got a chance to see how their gardens had filled in. I want to comment on just two gardens with interesting patios.
The first was an idea I cooked up. It involved using pavers set in concrete around the edges of the patio. Executing it was a contractors’ nightmare I suppose. I wanted the pavers to be included in the final pour so the patio flowed together. First we did a hand pour and set the pavers in around the edges. You’ll notice those white things in the photo. That’s where the planted edging around the lawn goes and we had to have a backstop for the concrete, so it wouldn’t pour into the dirt. We used some styrofoam that could later be taken out.

The pour
The boulders to the right of the above photo are set so no concrete flows beyond them. That area was a planted pocket.

As we poured the patio, we had to hand work the concrete into the spaces between the pavers and wipe the pavers off of the concrete. We had to work fast and it was tedious. Like I said, a contractors nightmare!

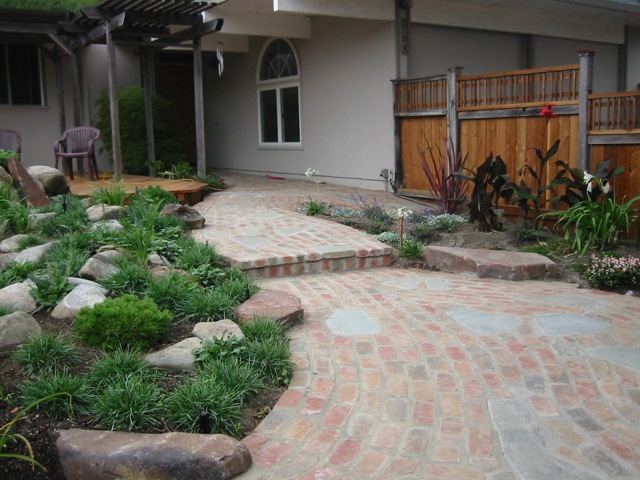
Carex lawn with small plants as edging
I didn’t want the concrete to butt up to the lawn. I wanted a softer edge so I used a mixed planting of grasses and Stachys ‘Hummelo’, a small flowering Stachys which isn’t flowering in this photo, but flowers all summer long. The lawn itself is Carex pansa. The owner has two children who were around 10 and 8 at the time. They were able to play ball on the lawn.

Pavers set in concrete
Originally I’d picked out a dark purple colored paver, but that was too wild for the client so we went with a more subdued look.
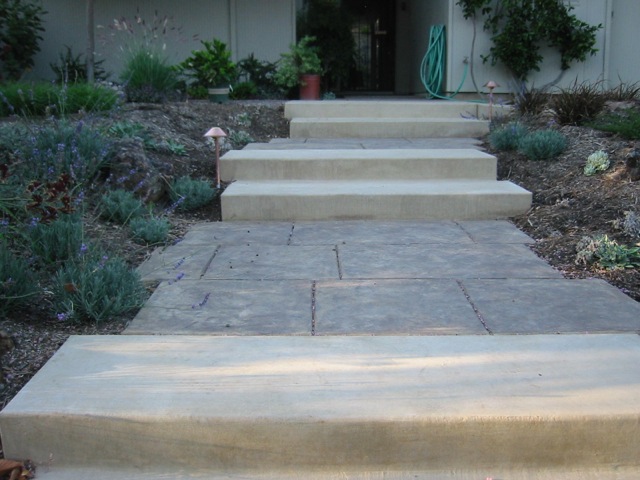
The client asked for a small patio/sitting area in the corner of her garden. Instead of using more concrete, I chose decomposed granite with the addition of a few pavers in it to match. A path of the same pavers set in soil with ground cover leads to the patio.
Decomposed granite small patio with pavers; Pavers set in Dymondia groundcover
I say that a yard takes about 6 or 7 years to mature. This yard is about 4 years old, still growing in, but I was pleased at its progress.
I also visited a garden that used the DG dusting method described in a previous post. This garden was installed five years ago. The DG still looked excellent, but in a few spots you could see exposed baserock. After five years it’s time for another dusting of DG. In making a decomposed granite patio, the major expense in materials is the DG. At over $80/yard, doing a dusting instead of 2″ saves quite a bit of money.

Decomposed Granite patio dusting method after 5 years needs new 1/2″ DG application

The paver patio set in concrete looked good, although the client never had it sealed. Sealing is really not necessary with a hard stone, but it does bring out the wonderful colors of the stone. Here is a photo of some of the detail work we did with her patio. My client is an artist and fun to work with. She’s willing to take risks and stretch the boundaries. She wanted the edges to have a ‘river’ like look. She personally went and hand picked all the river cobbles as well as placed them herself.

Placing the edging cobbles

River rocks edge patio for an artistic look

cobble edging detail around natural stone seat
And to leave all you readers with a final funny thought: While driving around nearby Belvedere, the most upscale and expensive neighborhood in Marin County, my son and I saw a police car parked at a prominent corner with a stop sign. When we looked inside, there was a dummy policeman, complete with a donut and coffee mug on the dash. I guess the wealthy citizens of Belvedere can’t afford a real policeman to deter criminals.

Belvedere ‘fake’ cop. Dummy with coffee and donut on dashboard
Filed under: Gardening | Tagged: Carex pansa lawn, Concrete patio, Concrete patio ideas, Decomposed granite patio methods, Decomposed granite patios, DG Patios | 1 Comment »