


The demo is completed. The new soil has been worked in and the area is clean and ready for designing. Most important, all my plants have arrived. I always gather all my plants on site before I begin. You wouldn’t want to paint a picture without all your colors to chose from?
First I must have my anchors in place in order to work my design. In addition, I am going to use boulders in the beds, so they are all laid out, ready to select from.
My first anchor is obviously my tree. The guys plant that first. I also have them plant my backdrop, which are the plants I’ve selected for the well. These are 15 gallon Azara dentata, a shade tolerant large leafed fast growing plant that is upright–perfect for this location. Remember, I will keep the Maytens tree for now, with the intention of removing it when the Azaras fill in.
I place my edging of basalt bricks and then begin placing the boulders, as they will determine how and where I place my larger plants. 
This photo shows my basalt bricks of two different sizes (randomly placed) and my boulders. Ignore the irrigation hose as we have not yet reworked the irrigation. There was existing irrigation which, at the very end, we will rework.

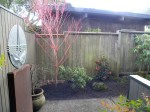
Here is my Sangu Kaku Maple. I am standing at the doorway and looking out. This area is not at all finished, but you can see how much cleaner it looks already, with the Maple, a Daphne at its base, and a wonderful Yuletide Camellia to the right. The Camellia is an upright variety that will fill that fence wall without obstructing the view of the maple from down the walkway. It also blooms in the winter around Christmas.
With the tree anchored, I need to move that Tree Fern (see photos previous post) or it will be in the way of the view of my Maple. We dig it up carefully, and I have an idea it might just fit in an old tree stump with enough room to walk underneath. If it works it will frame our front doorway nicely. Let’s try it.
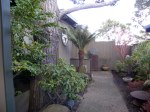
 It works great. Now I have a framework to the left and the right of the entrance to the front door. And I have anchors for my new design on both sides. Remember, we’re just beginning the design process on this side of the walk. We’ll plant ferns and other spillers below the tree fern later. We’re just getting our large plants laid out and our framework in for now.
Now for the entrance gate. I needed something to frame the other side. I had a Podocarpus that wasn’t pruned too badly on the one side, but the left side was empty. I am not an advocate of same thing both sides, but I am an advocate for balance. The doorway to the duplex needed framing and needed balance. Below was my solution with color that popped the plants out.
 The ‘Icee Blue’ Podocarpus will eventually grow up and frame the doorway. While the Pieris is much slower growing and will simply cover the fence. Remember, I haven’t added any ground cover or finished this bed yet.
On the other side, the tenants’ side, the guys have finished installing the Azaras and we’ve planted the bed.

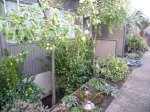
 This is a small bed so designing was quicker. Also, remember, it was completely demo’d so we didn’t have to move plants around. The Azaras hide the foundation immediately; I placed the boulders than filled in with variegated Daphne, a purple dwarf Rhododendron and some evergreen Hellebores, with ferns and vinca for accent. Right away it looks cleaner. Ignore the hose in the background. Since the irrigation is not yet connected, we will hand water till the installation is completed. It is important to keep these new plants irrigated for the first few weeks till they are established.
One last photo will show the line of basalt stones. 
At first I was going to use this edging only part way. But now I decided to pick up some more stones and continue the edging. A small Japanese stone fountain will interrupt the line, like it is part of the edging. I’ll complete this next week. When finished, the stone water basin will have a tiny drip line going into it so it will stay filled with fresh water for birds. The new White Camellia will be espaliered over time by the gardener–a new gardener that understands plant material. The variegated Abelia at its base will recover from its balled haircut and form a low umbrella-like edging. The Preziosa Hydrangea beyond will grow taller and provide that red accent.


Filed under: Gardening | Tagged: Entrance gardens, Japanese style entrance gardens, Small gardens |

[…] Entrance Gardens Part 2 […]
LikeLike