I thought I’d do a series of posts as I work to revive a tired garden in Sausalito. Portions of this entrance I’d worked on over 10 years ago, but because the owner’s gardener had no idea had to do real maintenance, the garden had disintegrated into disrepair. Portions of the design were still intact, much of the original plant material still useful, but a total rehaul was necessary.
A word to the wise: I find the most common mistake is a homeowner who’s willing to pay between $20K and $100K to install a garden, yet they’re cheap on the maintenance. Gardens are not kitchens–you don’t install them and then they stay exactly the same. Gardens are alive, and a design slowly grows to maturity. If your maintenance gardener doesn’t 1. have any idea how to care for specific plants i.e. water, fertilizers, 2. know how a plant grows i.e. prunes everything into a ball and 3. has no artistic sensibility–then don’t hire them. Spend the extra money on maintenance and your garden will grow into what the designer imagined. In addition, my best gardens either have me come back every so often or hire my skilled and personally trained maintenance crew.
This entrance garden is a duplex. I did the owners’ side a dozen years ago and left the tenants side alone. Now I am re-designing both sides. Redos are different than blank slate installations. I usually consider the plant material I want with only an idea of where it will go, then I purchase my plants with the intention of them being like a painters’ palette. Because there are existing plants that I can move around and reuse, I am ‘designing on the fly’. So here’s how you can do this at home. Here are the before photos.


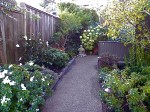
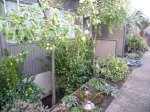
This is the tenants side which hasn’t been touched in years. Spider plants dominate (they are really an indoor plant and very invasive in warmer climates such as here). The top photo has some plants in pots, a tired Nandina that will be removed, and two Podocarpus side by side. We’ll remove one of them and leave the other to frame the doorway. In the second photo you can see there is a deep well behind the planting bed where the foundation of the house is visible. That needs to be covered and used as a backdrop for the planted material in the beds. These are very small beds and, since they are in an entranceway, they can take detail plant material and focal points.
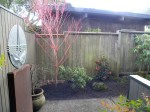
Not easily visible here, there is an old ornamental pear on the other side of this gate. We’ll remove that. Once removed there will be additional light, and also the ugly backdrop disappears. Sky is better than old tree limbs that are dying. Here’s another view of the well behind the spider plants. We will clean up down below. There are two different kinds of trees. The one on the right is a Maytens. It is stunted, not correctly pruned, and doesn’t fit the space. The one on the left is an ornamental Evergreen Pear. Allowed to grow up and correctly pruned, this fits our Japanese look better. I’ll plant this area with the intention of removing the Maytens as soon as the new plant cover grows up. Not visible is a very large Monterey Pine and a Live Oak. These provide a canopy of dappled shade for our new plants.
As you can see by the above view, its crowded. Your eye doesn’t know where to go, so everything just becomes a ‘mush’. We’ll create an intimate and more focused space, with more ‘room’ in between the plant material.
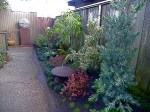
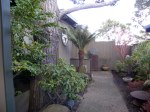
 This is the owners side that I worked on a dozen years ago. A large existing tree used to be in the corner behind the fern. That was taken out several years ago by the owner. The variegated Pittosporums I installed were never pruned and are now too large and leggy. We’ll have to remove them completely now. Much of the finer ground cover like the Luzula aurea in the foreground has been allowed to take over, and the Rhododendrons were not properly pruned and are now large and leggy. We’ll discard some of the material and use others.
My first consideration in choosing plant material is texture and color of leaf. In a shady garden, there won’t be a lot of color in the blooms, so I’m going to make choices in leaf color. I have learned not to mix yellow and white variegation, so choose one or the other. I’m going to go for white here, with red in places to pop things out.
In looking at the last photo of the owners side, I want to place something at the very end to pop things out, so I chose a Sangu Kaku Japanese Maple, or Coral Bark Maple. This maple has a red bark year round and is highly attractive in leaf. But in order to see the maple, I’m going to have to move that large tree fern. I know this, but haven’t yet figured out where it will go. That will happen on site, during the design process.
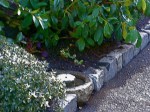
On the tenants’ side, I’ll remove all the plants, except the white flowering Azalea and one of the Podocarpus’. Since this is a contained bed, here’s our chance to totally revamp the soil. We’ll remove up to 8″ of soil and replace it with a good Rhododendron/acid mix. In addition, if you notice in photo 1, the tenant’s side of the fence has a very small bed, much smaller than the owners’ side. The soil is rocky there with a lot of roots from trees. We’ll give ourselves extra room by shoring up the bed with some Japanese looking basalt ‘bricks’.
I chose a palette of Daphnes, variegate Pieris, ‘Icee Blue’ Podocarpus, Ophiopogons, Rhodies, red leafed Kurume azaleas, Preziosa Hydrangea (they have red leaves), variegated Abelia, variegated Vinca minor, some Rubus, purple-leafed Oaxalis, Japanese painted ferns and native Blechnum spicant ferns.
In my next post I will show you the installation in progress.
Filed under: Gardening | Tagged: Entry gardens, Small gardens | 1 Comment »